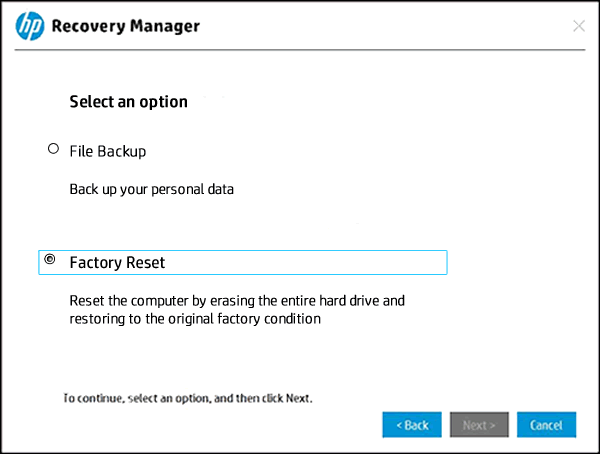
Monday, November 23, 2020

how to check Hp PRODUCTS WARRANTY

How to check HP PRODUCT WARRANTY

FOLLOW  ЁЯСг BY ЁЯСг

1 - Open below url link type in browser

https://support.hp.com/us-en/checkwarranty

Open url show this type page 
STEP 2

Select the country of laptop manuftured 

exm:- India

STEP 3

Enter serial number of your laptop example below

fill serial number in box

STEP 4
Show status your laptop warranty on web page

Sunday, November 15, 2020

HP Laptop Desktop Printrr Ploter etc device driver download step

HP DRIVER DOWNLOAD STEP

1 Open browser and Tpye

https://support.hp.com/in-en/drivers/laptops

Show below page on screen
2 STEP

Select your device and show screen on your computer and type Device Serial Number/ Model Number / Model Name 

3 STEP Select Window /Operating System 

Exp: Windows 8, 10 

4STEP SHOW ALL HARDWARE SUPPORT DRIVER SHOW ON SCREEN SELECT AND DOWNLOAD DRIVER FOR LAPTOP


Friday, November 13, 2020

HOW TO RUN HP CLOUD RECOVERY IN LAPTOP AND DESKTOP AND ALL IN ONE PC

HP CLOUD RECOVERY PERFORM IN LAPTOP DESKTOP AND ALL IN ONE PC

Use the recovery boot device that you created using the HP Cloud Recovery Tool to recover your system.
  1. Back up your personal files if you have not already done so. Go to HP PCs - Backing Up Your Files (Windows 10, 8) or HP PCs - Backing Up Your Files (Windows 7) for more information.
  2. Disconnect all connected devices and cables such as Personal Media Drivers, USB drivers, printers, or faxes.
  3. Remove media from internal drives and remove any recently added internal hardware.
    NOTE: 
    Keep the monitor, keyboard, mouse, and power cord connected to the computer.
  4. Insert the USB boot device that you created, and then turn off the computer.
  5. Turn on the computer, and then immediately press the Esc key repeatedly, about once every second, until the Startup Menu opens.
  6. Press the F9 key to open Boot Device Options.
  7. Use the up or down arrow keys to select the USB drive, and then press Enter.
    NOTE: 
    More than one USB drive might be available from the list of devices. If so, select one of the USB drive options from the list to see if HP Recovery starts. If recovery does not start or a non-system disk error displays, restart the computer by pressing the power button, and then repeat these steps to select another USB drive. When recovery starts, continue with these steps to complete recovery.
     
    If you cannot select the recovery media drive from the Boot Menu, disable Secure Boot and enable Legacy Mode in the BIOS.
  8. When prompted to run Recovery Manager from the hard drive or from media, select Run program from media, and then click Next.
  9. Select a language, and then click OK.
  10. Select Factory Reset, and then click Next.
    Selecting Factory Reset
  11. On the Welcome screen, click Next.
  12. Select Recover without backing up your files, and then click Next.
    Selecting Recover without backing up your files
  13. Wait while HP Recovery Manager prepares the computer for recovery and copies the files to the hard drive.
    HP Recovery Manager prepares the computer for recovery
  14. Click Skip when asked if you received a supplemental recovery USB drive from HP Support.
  15. Click Continue when the recovery preparation completes.
       CAUTION: 
    Do not stop the process while the Windows partition is being reformatted and the files to restore the hard drive are being copied.
    Recovery preparation is complete
  16. Do not remove the USB flash drive or turn off your computer during this process. The computer might go through several Software Installation screens, including black screens with the HP logo, Windows system screens, and Admin screens. This is normal.
    NOTE: 
    The recovery process might take several hours to complete depending on the system configuration of your PC.
    Software installation screens
  17. After the recovery completes, click Finish to restart the system.
    Recovery complete
  18. You can remove the USB flash drive after the PC initial setup begins

how to make hp cloud recovery in pen drive

HP Consumer PCs - Using the HP Cloud Recovery Tool (Windows 10, 7)

This document is for certain consumer PCs with Windows 10 or Windows 7. It is not available for all HP PCs. For HP business PCs go to HP PCs - Using the HP Cloud Recovery Download Tool.
The HP Cloud Recovery Tool allows you to download recovery software to a USB drive.
Currently, the tool supports consumer PCs manufactured in 2016 and later. Earlier computers are being added on an ongoing basis. If you purchased your computer before 2016, go to HP Customer Support - Software and Driver Downloads for other available recovery options.
To determine if your model is supported, go to HP PCs - HP Cloud Recovery Tool Supported Platforms.

Step 1: Prepare for recovery

Prepare your computer for system recovery before you download and install the HP Cloud Recovery Tool.
  • Back up your personal files. Go to HP PCs - Backing Up Your Files (Windows 10, 8) or HP PCs - Backing Up Your Files (Windows 7) for more information.
  • Set aside 1 to 4 hours for the recovery process. The recovery time varies depending on the network and USB drive.
  • Make sure you have a computer with an active Internet connection. For best results, an Ethernet connection is recommended.
  • Make sure to use an AC power connection to the computer during the process. DO NOT disconnect from the Internet or AC power during the process to avoid recovery failure.
  • Make sure you have a blank USB drive with a minimum of 32 GB.
  • Make sure your computer has a minimum of 20 GB free disk space on the Windows partition.
    NOTE: 
    Do not use an external hard drive. The tool does not work when downloaded to an external hard drive.

Step 2: Download and install the HP Cloud Recovery Tool

Download the HP Cloud Recovery Tool.
NOTE:
  • Do not install the HP Cloud Recovery Tool on an external hard drive. The tool does not work when downloaded to an external hard drive.
  • HP Cloud Recovery Tool can only be installed on Windows 64-bit, but not on 32-bit versions.
  • Windows 10 only
    1. From your PC, go to the Microsoft Store and search for HP Cloud Recovery Tool.
    2. Select the HP Cloud Recovery Tool App from the search results, and then click Get. Microsoft downloads and installs the App.
      HP Cloud Recovery Tool installed
  • Windows 10 or Windows 7
    1. To download the recovery software, click HP Cloud Recovery Tool.
      NOTE: 
      Alternatively, you can go to the HP Customer Support page and search for Cloud Recovery.
    2. Download and install the HP Cloud Recovery Tool. If you are prompted with a choice to run or save the file, click Run.

Step 3: Run the HP Cloud Recovery Tool

Use these steps to run the recovery software.
  1. Insert a blank USB drive (minimum 32 GB) into the computer, and then make sure the computer is connected to the Internet.
    NOTE: 
    Any data on the USB device is permanently deleted during this process. When the process is complete, the USB device contains only the recovery software.
  2. In Windows, search for Cloud Recovery, right-click HP Cloud Recovery Tool, and then select Run as administrator.
    If a Do you want to allow this app from an unknown publisher to make changes to your device? message displays, click Yes to continue.
    HP Cloud Recovery Tool with Run as administrator selected
  3. Carefully read the message on the HP Cloud Recovery Tool Welcome page, and then click Next to continue.
    HP Cloud Recovery Tool Welcome page
  4. Proxy Configuration window:
    • If you are downloading the recovery software on a secure network, the tool automatically detects and populates the proxy information. Click Next.
      NOTE: 
      If the proxy information does not automatically populate, check with your network administrator for the proxy information, and then enter it in the appropriate fields.
    • If you are downloading the recovery software on an unsecured network, skip to the next step.
    Proxy Configuration window
  5. Complete the System Information.
    • If you are running the tool on the computer to be restored, when the HP Cloud Recovery Tool detects the system information for your device, click Next.
      System Information Page
    • To manually enter the system information, check the box next to I need to enter Product ID for my HP System, enter the information for the computer to be restored, and then click Next.
      NOTE: 
      If the Product ID has an ‘AV’ before the pound sign # and the three-digit number, do not include the #xxx (where ‘xxx’ represents a number). For example, a Product ID such as JGT75AV#123, you would not include #123. Doing so generates an error.
      The Product ID might be located on the back cover of the PC. Otherwise, go to How Do I Find My Model Number or Product Number? (Desktop) or How Do I Find My Model Number or Product Number? (Notebook) for more information.
      Label with Product ID displayed
    • If the message Product ID is Not Match or Invalid. Check the "I need to enter Product ID for my HP system" and manually fill Product ID in. displays, your device is not yet available in the Cloud Recovery Tool. Go to HP Customer Support - Software and Driver Downloads for other available recovery options.
      Screen with "Product ID is Invalid" message
  6. Select your USB device from the drop-down menu, and then click Next.
    Selecting USB device
  7. Carefully read the confirmation message informing you that any information on the USB drive is deleted during the process, and then click OKBack, or Cancel.
    Notification that USB content is deleted during the process
  8. Click Next to continue.
  9. Wait while HP Cloud Recovery Tool creates the Recovery Image on your USB drive.
    A progress bar showing the preparation of the selected USB drive as an HP Recovery boot device displays. Click Cancel at any time to terminate the process and exit the utility.
    NOTE: 
    This process might take several hours depending on the system configuration of your PC. Do not interrupt the progress by removing the drive(s) or rebooting the machine. If the process is interrupted, an error message displays.
    Progress bar showing USB preparation
  10. If the message The recovery USB Flash drive is ready. Do you want to delete the downloaded temporary files to save space in the drive? displays, click Accept to continue.
  11. When the process completes, click Finish.
    HP Cloud Recovery Tool complete window

no display issue

рдЗрди рд╕ुрдзाрд░ों рдХो рдЖрдЬ़рдоाрдПं: рд╣ो рд╕рдХрддा рд╣ै рдЖрдкрдХो рдЙрди рд╕рднी рдХो рдЖрдЬрдоाрдиा рди рдкрдб़े। рдЬрдм рддрдХ рдЖрдк рдЕрдкрдиे рд▓िрдП рдХाрдо рдХрд░рдиे рд╡ाрд▓े рд╡्рдпрдХ्рддि рдХो рдирд╣ीं рдвूंрдв рд▓ेрддे, рддрдм рддрдХ рд╕ूрдЪी рдоें рдЕрдк...